
Electronic Inspection Solution - Version 1.1
Contents
1.1 Scanning documents
1.2 Enhanced workshop screen view
1.3 Password Enhancement
2.1 Mileage Check
2.2 Tachograph - Last Calibration Date
2.3 Navigation around the PDA
2.4 Action of Outstanding TM codes
2.5 Tyre Pressure PSI Default
2.6 Tyre Completion
2.7 Brakes Locked On Road Test
3.1 Schedule
Filter
3.2 Schedule
Work
3.3 Parameters
(Stage 1)
3.4 Parameters
(Stage 2)
3.5 Schedule
Work for Synchronization to the PDA
3.6 Completion
of Inspections
6.1 User Login
6.2 Purge PDA
6.3 Users
6.4 Selection
Arrows
6.5 Colour Key
6.6 No. of
Inspections currently in use
6.7 Calendar
Selection
7.1 Scheduled Work
7.2 Overdue Work
7.3 Completed Work
7.4 Year Planner
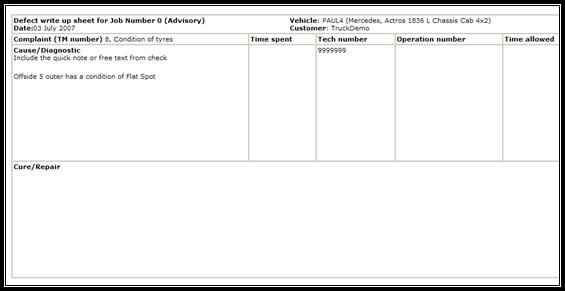
8 Adding Notes to Completed Inspection Sheets
Electronic Inspection Solution (EIS) Version 1.1 is an
enhancement to version 1 and offers the following features and benefits.
1.1 Scanning documents
EIS now allows the user to scan in legal documents at any
point during the inspection process. The facility still exists for a document
to be scanned separately from the inspection.
1.2 Enhanced workshop screen view
Jobs are now grouped
and colour coded on one screen by “Incomplete”, “Completed” and “Scheduled
work.”
The ability to arrange screens by
group/category/date, all the data is located on one screen making it easier to
search for vehicles and inspections.
The ability to control down loading of schedules thus,
reducing the number of dealer errors in terms of set-up. The user can choose
which inspections to “book in” and which vehicles to add into the workshop
ready for downloading.
The User is able to delete and move multiple lines within
EIS workshop. This will reduce processing time.
Enhancement to Tyre layout screen, all tyre data is now
displayed on one screen making the section easier to view and complete.
Change to entry and reporting of Brake Test figures.
1.3 Password Enhancement
When setting up new users within
workshop the user has the option of selecting their own password or using the
default password, this is without the need to log out and then back into the
application.
2.1 Mileage Check
If the Technician enters a mileage less than that
previously recorded (from the last inspection) a warning box will appear
“Mileage is less than that previous are you sure you wish to proceed.” The
program will allow entry of the lesser mileage, however, it is strongly
recommended that this is reported to a supervisor, team leader or reception
staff. The previous record or inspection should be checked for possible input
errors.
2.2 Tachograph - Last
Calibration Date
If
the Technician enters a Tachograph Date less than that previously recorded
(from the last inspection) a warning box will appear “Tachograph Calibration
Date is less than that previous are you sure you wish to proceed.” The program
will allow entry of the lesser Date, however, it is strongly recommended that
this is reported to a supervisor, team leader or reception staff. The previous
record or inspection can then be checked for possible input errors.
2.3 Navigation around the
PDA
When using the PDA it is now possible to enter and exit a
group without having completed each TM code in that group. The user is able to
return to the group later to complete the remaining TM codes.
Upon entering the Inspection the user will be presented
with all the TM groups. All groups will be visible. However, a RED BORDER can be seen around the outside of each
uncompleted group
The user can select any group to start from and will be
able to sequentially move down each TM No in that group. However, the user is
able to select the new “CLOSE” button (bottom right hand side of the screen) to
exit this group and display all groups for selection. Note: the “CLOSE” button
replaces the “NEXT” button from the previous version. Any group’s the user has
previously entered and completed remains the same as previous version.
2.4 Action of Outstanding TM
Codes
Where there are any outstanding
TM codes to action the affected groups will continue to be shown with
the RED BORDER on the main group page. All
these groups must be re-visited and any outstanding TM codes must be completed.
If the user re-enters a group that was previously actioned
they will automatically be shown the next uncompleted TM code. The user
completes this in the same way as before sequentially moving down the remaining
TM codes until all complete, this part of the inspection can then be deemed as
finished and the RED BORDERS will disappear and
the user can move onto the Tyre section by selecting the NEXT button at the
bottom right hand side of the PDA.
2.5 Tyre
Pressure PSI Default
The PDA tyre pressure entry automatically defaults to PSI.
This is carried forward from the Workshop Screen.
2.6 Tyre Completion
The user will also notice that the same RED
BORDER is shown around each of the uncompleted tyre sections, the same
rules apply here as in the Inspection check section.
2.7 Brakes Locked On Road Test.
There is a new checkbox on the “Road/Brake Test” section
called “Brakes Locked”, if checked it will automatically add “Brakes Locked on
Road Test” to the comments box, in this instance, there is then no need to
enter percentage figures in Service, Secondary or Parking. When the inspection
is uploaded back to the PC Workshop application the three brake TM items will
be “Serviceable” (Green). If the brakes locked button is unchecked, it will
remove the text and make the 3 TM numbers “Non Serviceable” and percentage
figures will be required.
3. Workshop Screen
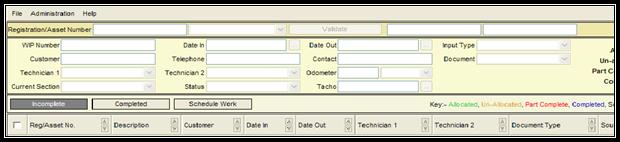
3.1 Schedule Filter
The Version 1 schedule filter options of past/today/future
have been replaced with the three icons as shown included in the new header
(below) and in more detail in (Fig 1)
![]()
(Fig 1)
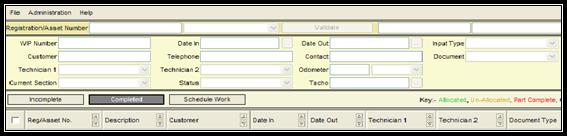
The Version 1 current, allocated, unallocated or Part
complete option is now replaced as shown in (Fig 2). The current Completed
option is now replaced as in (Fig 3)
![]()
(Fig 2)
![]()
(Fig 3)
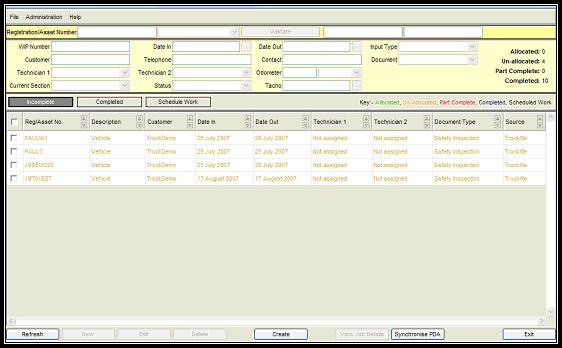
3.2 Schedule Work
![]()
(Fig 4)
A new icon of SCHEDULE WORK (Fig 4) is provided so that the
user may see the work that is due to be carried out in the workshop application
for a given period of time. The data seen is based on the User’s choice of
Schedule Parameters. The Information here is provided from the Core
Application.
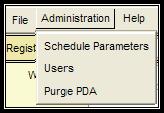
3.3 Parameters (Stage 1)
The schedule parameters (Fig 5) are accessed from the
Administration Menu
Select Schedule Parameters to decide the required period of
time that the user wishes to download from the Core application to the Workshop
application
(Fig 5)
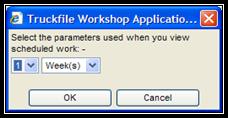
3.4 Parameters (Stage 2)
The user can decide from the drop
down menus the exact amount of DAYS, WEEKS OR MONTHS (Fig 6) required for
downloading.
(Fig 6)
The work scheduled from the Core Application will then be
seen in the Schedule Work window (Fig 7). TIP:
Select REFRESH to check for the latest downloaded data position
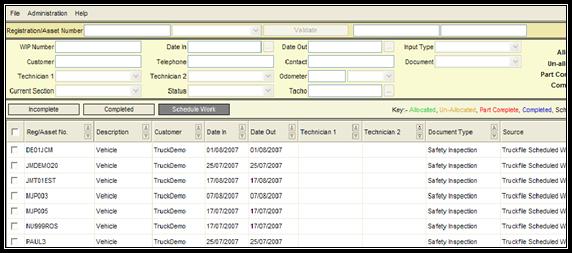 (Fig 7)
3.5 Schedule Work for
Synchronization to the PDA
To create a inspection to be included for download to the
PDA, the user must select the required line(s) (Fig 8) by ticking the left hand
end column(s) (in this case 4 inspections have been selected) and selecting the
create button (Fig 9)
 (Fig 8)
(Fig 9)
The user will notice that the inspections selected have
been automatically transferred to the INCOMPLETE section (Fig 10)
From here the user selects the inspection(s) to synchronise
by ticking the appropriate left hand end column box(s) and then clicking on the
synchronise PDA button (Fig 11)
![]()
(Fig 11)
The inspections selected will be downloaded to the
currently docked PDA ready for the Technician(s) to complete.
3.6 Completion of
Inspections
Any inspections now completed on the PDA will appear in the
COMPLETED WORK (Fig 12) section. This is particularly useful when referring
back to inspections completed prior to the current day and allows the user to
select in order of priority (i.e. overnight shifts).
TIP: If the user requires too carry out the inspection via the
PC then the Status must be manually changed to Completed. The Apply to all
button can then be selected (as Version 1).
 (Fig 12)
To complete an inspection in EIS, the user highlights the
required line and can either, double click to enter the inspection sheet, or
select the VIEW JOB DETAILS (Fig 13) available at the bottom of the screen.
![]()
(Fig 13)
Regardless of the option chosen above the user will see the
selected “completed” Workshop inspection screen (Fig 14) and allow the user to
check and complete the inspection up to the point of Final Sign Off
 (Fig 14)
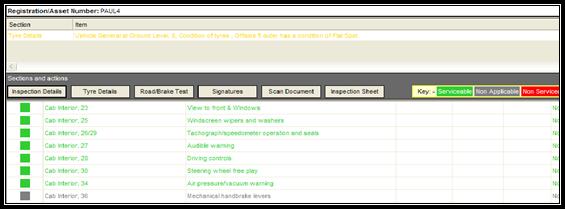
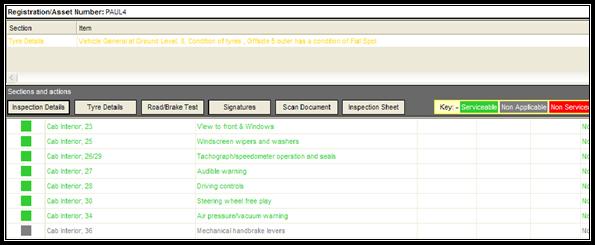
As in version 1.0 the main inspection screen needs to be checked for NON SERVICEABLE or ADVISORY ITEMS,
Non Serviceable items require to be rectified and advisory items checked for
suitability (Fig 15).
 (Fig 15)
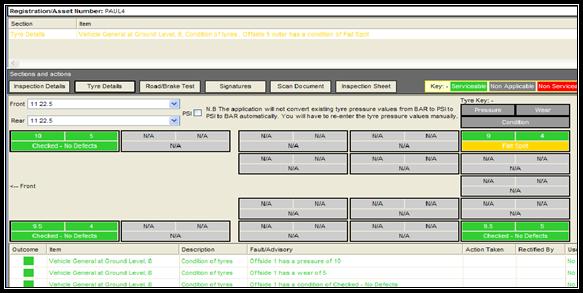
The tyre details tab now shows a combined screen (Fig 16).
 (Fig 16)
Tyre Pressures, Tyre Tread Depths and Tyre Conditions MUST still be completed and rectifications dealt with as Version 1.
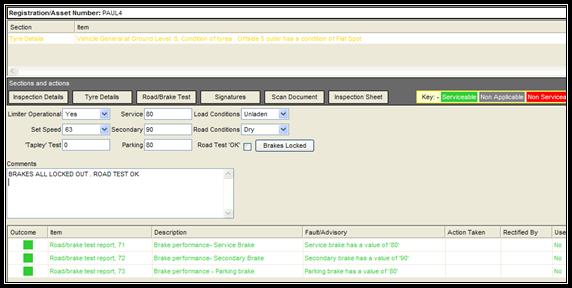
The Brake Test (Fig 17) has changed to include either a
Tapley Test or Rolling Road Test. If a Tapley test is undertaken the speed at
which the test is carried out must be entered in the Field entitled “Tapley
Test” i.e. 10 kph. Enter the Service, Secondary, Parking percentage as normal.
This will be recorded as Tapley test on the inspection sheet.
If a rolling road test is to be carried out leave the
“Tapley Test” field blank and enter the Service, Secondary, Parking percentage.
This will be recorded as Rolling Road test on the inspection sheet.
 (Fig 17)
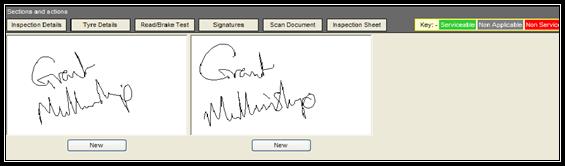
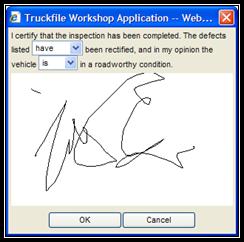
Signatures to be completed as version 1 (Fig 18)
 (Fig 18)
Scan documents, shown in (Fig 19), now has
the ability to hold the document in the background of the Workshop application
(MOT certificates etc) further documents can be added at any stage prior to
sign off. Documents may also be deleted from here prior to sign off but the
application must be saved for both addition and removal of documents to take
effect.
 (Fig 19)
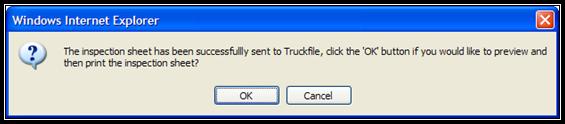
The Inspection Sheet Button also shown in (Fig 19) is
designed to allow the user to print off a copy of all outstanding faults. This
may assist workshop Controllers view incomplete/non serviceable faults and
allocate them to designated technicians in order to rectify. The report is also
useful to record defects carried over from a previous shift (Fig 20)
 (Fig 20)
It is strongly advised that all data screens
are checked prior to and after the SAVE (Fig 21) has been selected and before
exiting the program or sending the document to the web. Failure to save will
result in changes being lost. When successfully saved the “all details saved”
box will appear (Fig 22).

(Fig 21)
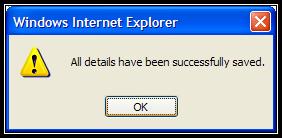
(Fig 22)
4. Final Sign Off
The Final sign off sends the completed data to the EIS
server (Fig 23)

(Fig 23)
This is ONLY available when the inspection is correctly
checked and all Non Serviceable items have been rectified. The SIGN OFF window
now displays a new option (Fig 24) to ask users to confirm their intention to
sign off the Inspection.
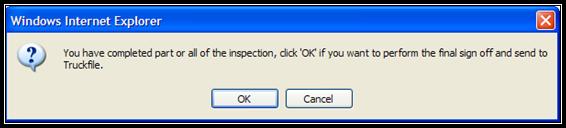 (Fig 24)
The default settings are shown in (Fig 25)
(Fig 25)
ENSURE
THE FINAL SIGN OFF OPTIONS ARE CORRECT BEFORE SELECTING OK AND SENDING THE
INSPECTION TO THE EIS SERVER.
5. Printing Documents
The user is able to PRINT the inspection document (Fig 26),
to a printer of their choice within their DMS system or local printer.
(Fig 26)
6. Useful features
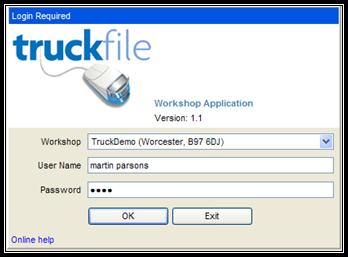
6.1 User Login
(Fig 27)
The Login Required screen now highlights the Workshop the
user is accessing and the User Name. (Fig 27)
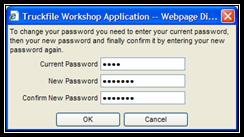
Note: The user password is allocated during the standard
Set up. This should be changed on first access to the Workshop application.
This can be altered by choosing File > Change Password from the Top Menu on
the Workshop entry screen (Fig 28). This applies to the User already logged in.
For general password creation/update see Section 6.3 Users.
(Fig 28)
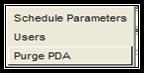
6.2 Purge PDA
The Purge PDA (Fig 29) option is only available when a PDA
is connected to the PC and “active sync” is on-line and the correct user
permission is granted. This will clear all data from the PDA therefore care
should be taken when using this facility.
(Fig 29)
6.3 Users
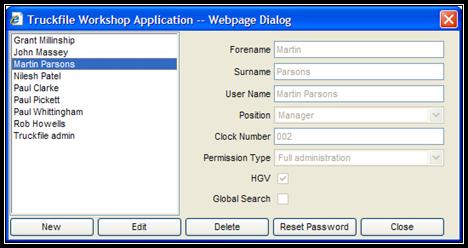
(Fig 30)
The User window is available, dependent on permissions, in
order to create and edit new/existing Workshop personnel (Fig 30). For more
information on User Permissions consult the EIS support team.
On saving the record the Password Screen appears (Fig 31)
it is now possible to allocate a user password (the default being 1111). It is
recommended for new users that the default be changed immediately (as in
section 6.1 User Login). If the default is accepted then the Reset Password
must be used when updating existing records. The Technicians Passwords are
numeric (e.g. Clock numbers) these must be maintained in order to
utilise/access the PDA application.

(Fig 31)
6.4 Selection Arrows
The user can change the order of the screen columns by clicking on the
arrows at the top of each column (Fig 32)
 (Fig 32)
6.5 Colour Key
This indicates the colour coding of each page/inspection
(Fig 33)
![]()
(Fig 33)
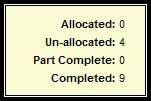
6.6 No of Inspections
currently in use
This indicates the current no of inspections in use and the
various stages they are held at (Fig 34)
(Fig 34)
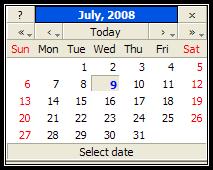
6.7 Calendar Selection
The updated Calendar window and Instructions are shown in (Fig 35 &
36)
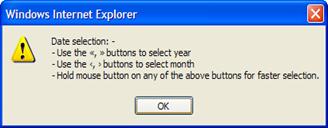
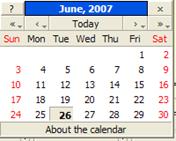
(Fig 35)
(Fig 36)
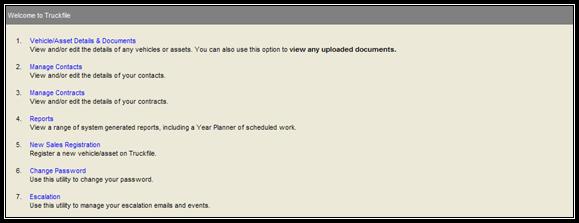
7. Reports (Workshop)
There are two methods of accessing the Reports Module:
1. The Core Version from the Users Desktop (Rep 1). Select
Reports from the top menu followed by Workshop.
 (Rep 1)
2. The web version (Rep 2). Select Item 4 from the Main Menu
 (Rep 2)
The Reports selection screen will appear (Rep 3).
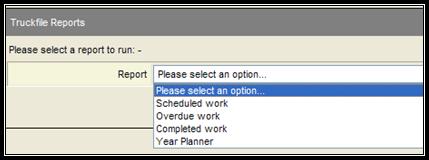
(Rep
3)
The User has a choice of Four Reports (See Rep 3):
Scheduled work
Overdue work
Completed Work
Year Planner
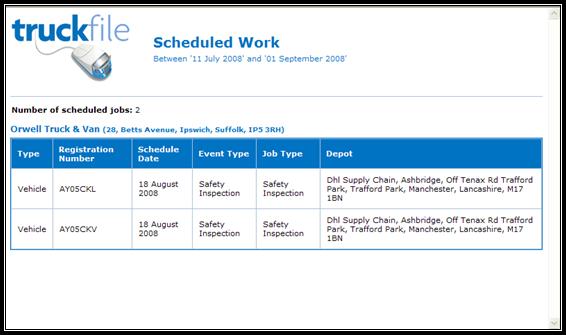
7.1 Scheduled Work
From the Report Field select Scheduled work (Rep 4)
from the drop-down menu. The user has the option of “All” or selecting from
their operator List. TIP Selecting the first
Letter of the operator name will find the first Alpha instance in the operator
list, further selection of the first letter will move down until the required
name is found. The User may choose the Depot linked to that Operator.
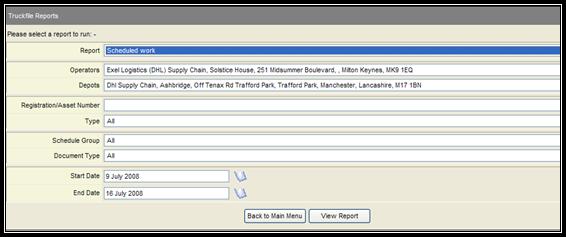 (Rep 4)
If required an individual vehicle can be selected by simple
entering the registration or asset number in the relevant field.
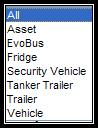
The report can be broken down further into the type of
vehicle:
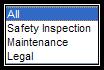
Or Schedule Group:
The document Type defaults to All.
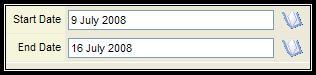
The Date range can be manually input or by clicking on the
Calendar icon to the right of the date field. See Section 6.7
In the example the Operator and Depot have been selected,
the example Report is shown below (the date range was changed to end on the 1st
September):
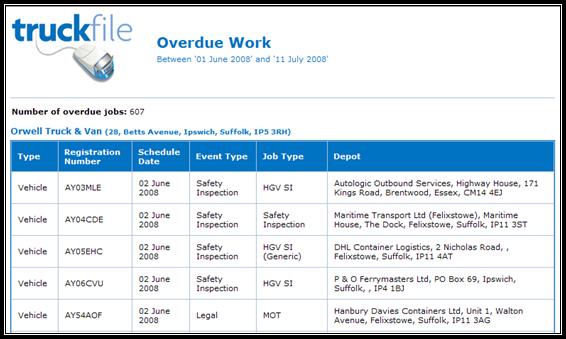
7.2 Overdue Work
Select “Overdue work” from the drop down menu (see Rep 3).
The same Options are available as in section 7.1. The example report below
reflects Inspections that have missed their due date: Note the date must be set
in the past i.e. in the example Start Date 01 June 2008, End Date 11 Jul 2008.
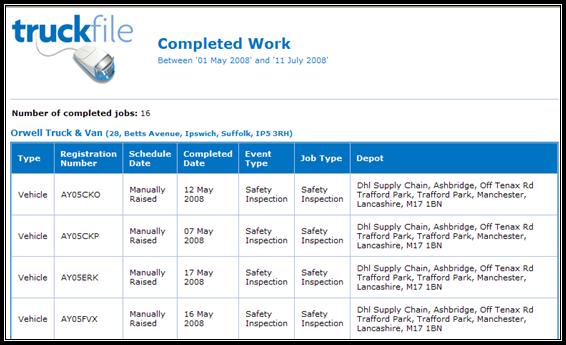
7.3 Completed Work
Select “Completed Work” from the drop down menu (see Rep
3). The same Options are available as in section 7.1. The example report below
reflects Inspections that have been completed Start Date 01 May 2008, End Date
11 Jul 2008.
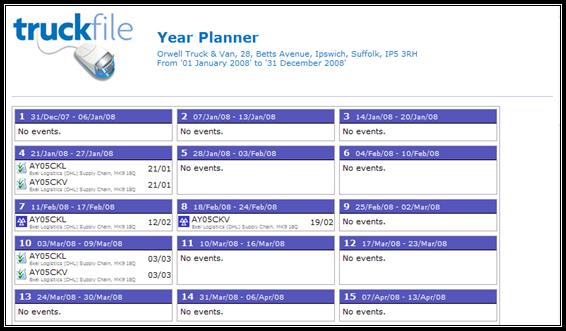
7.4 Year Planner
Select “Year Planner” from the drop down menu (see Rep 3)
The same Options are available as in section 7.1. The
example report below reflects the planned year 1 Jan 2008 to 31 Dec 2008. When
expanded the report will list the Full 52 weeks with week number and date
Check.
8. Adding Notes to Completed Inspection Sheets
The EIS User now has the ability to add Notes to a
completed EIS (Revision History). This is designed to give the Workshop the
ability to add further information or a corrective note against an error made
on the Inspection. This does not allow direct changes to TM code outcomes.
NOTE:
Access to this process should be set-up for personnel with administrator rights
including senior management or service advisors. If you do not currently have
access and fall into the above category, please contact the Support team or the
implementation Consultant responsible for your Dealer.
Log in to the Truckfile Core using your allocated user ID
and enter your password. Enter the registration number for the vehicle
requiring revision. Click on the Search button, once found click on the vehicle
to open the record. Click on the Timeline button (See Below).
![]()
![]()
Click in the View Document Button alongside the Inspection
to be revised. Scroll down to the base
of the inspection sheet. Enter the text to be added to the Revision History in
the box provided.

In the example below the text “TM Code 22 Should be N/A” is
to be added to the sheet.

After text has been added click on the ADD button to the
right. The revision will be complete. See below.

The Time Line will reflect the latest Revision Date and
Time. (Red Text)

9. Escalation
There are two methods of accessing the Escalation Module:
1. The Core Version from the Users Desktop (Esc 1). Select
Escalation from the Administration drop down menu.
 (Esc 1)
2. The web version (Esc 2). Select Item 7 from the Main Menu
 (Esc 2)
The Escalation creation screen will appear (Esc 3).
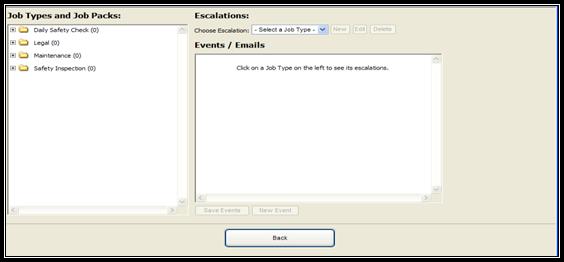 (Esc 3)
Select Safety Inspection from the Tree Menu on the Left of
the screen, opening the tree view will open the relevant Job Packs (Esc 4):
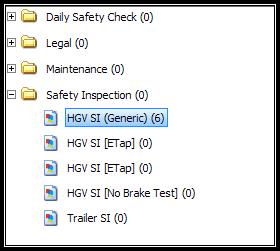
(Esc 4)
Highlight the relevant job pack e.g. HGV SI (Generic).
Click on the “New” button from the Escalation Section. (Esc 5)
![]()
(Esc 5)
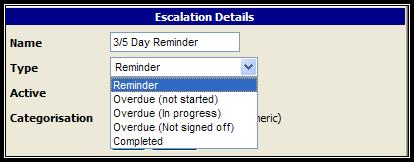
Add the name of the escalation, the example shown (Esc 6)
is “3/5 Day Reminder” This is user specific and is used for reference purposes
on the email.

(Esc 6)
Once the Name is input select the type using the drop down
menu (Esc 7). There are five Categories: Reminder, Overdue (not started),
Overdue (in progress), Overdue (Not Signed Off) and Completed. To ensure the
Escalation emails are produced tick the Active box.
(Esc 7)
In order to add an Event to the Escalation click the New
Event button at the base of the screen (Esc 8).
Enter the number of days before (in the case of reminder and after (in
the case of Overdue and Completed) in the example shown a reminder will be sent
5 days before the Inspection and again 3 days before the Inspection is due. Add
the email address(s) to the list (there is no limit to the number). The email
will be sent via the EIS Server at approx 2 pm the next day.
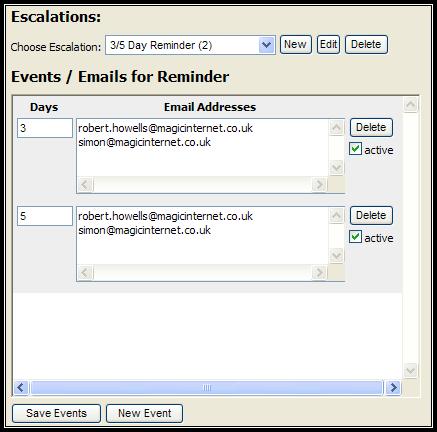
(Esc 8)
When complete click on Save Events. The user can select
Edit to change the Event or click on the Delete key to remove the Event. To
de-Activate the event click on the tick box, this will suspend the Escalation.
An example email is shown below:
Escalation Email Alert (3/5 Day Reminder)
Below are
listed all the vehicles which have work due soon.
Escalation Report: 3/5 Day Reminder (Reminder)
The report will only show vehicles which are scheduled into Safety Inspection
(and HGV SI (Generic))
--- Safety Inspection, HGV SI (Generic) [35 vehicle(s)] ---
|
Registration
Number |
Due Date |
Due in (days) |
|
AY03FVS |
23/07/2008 |
5 |
|
AY05FAM |
23/07/2008 |
5 |
|
AY07BZW |
23/07/2008 |
5 |
|
AY56AZF |
23/07/2008 |
5 |
|
AY56AZG |
23/07/2008 |
5 |
|
SF06NWU |
23/07/2008 |
5 |
|
MF52FAA |
23/07/2008 |
5 |
|
DIG54 |
23/07/2008 |
5 |
|
AY57AXH |
23/07/2008 |
5 |
|
AY07CFO |
23/07/2008 |
5 |
|
Y264KDB |
23/07/2008 |
5 |
|
AY54FWX |
23/07/2008 |
5 |
|
DIG55 |
23/07/2008 |
5 |
|
AY04EWB |
23/07/2008 |
5 |
|
AY04LCW |
23/07/2008 |
5 |
|
B13ASF |
23/07/2008 |
5 |
|
T2HWK |
23/07/2008 |
5 |
|
X304LPV |
23/07/2008 |
5 |
|
AY54EKB |
23/07/2008 |
5 |
|
AY53HGK |
23/07/2008 |
5 |
|
AY51HRJ |
23/07/2008 |
5 |
|
AY07CAA |
23/07/2008 |
5 |
|
AY03KHU |
21/07/2008 |
3 |
|
MV02XJZ |
21/07/2008 |
3 |
|
AY06CVJ |
21/07/2008 |
3 |
|
OE02VCV |
21/07/2008 |
3 |
|
AY07BZU |
21/07/2008 |
3 |
|
YR52OCH |
21/07/2008 |
3 |
|
AY04EWR |
21/07/2008 |
3 |
|
AY57AXM |
21/07/2008 |
3 |
|
AY07BVG |
21/07/2008 |
3 |
|
AY07
BVF |
21/07/2008 |
3 |
|
AY53BHX |
21/07/2008 |
3 |
|
AY54GKJ |
21/07/2008 |
3 |
|
AY57DZK |
21/07/2008 |
3 |